Indian Crafts for Kids with a Rich Heritage & Culture · Craftwhack
Craft time is a fun and artistic manner to engage your children and expose them to new art and cultures. India is bursting at the seams with a rich and varied background, with a heritage and civilization and so diverse that at that place is no end to the possibilities of what you can replicate during art and craft time.
Hither are five fun and creative Indian crafts for kids to larn and enjoy.
i. Pot Painting
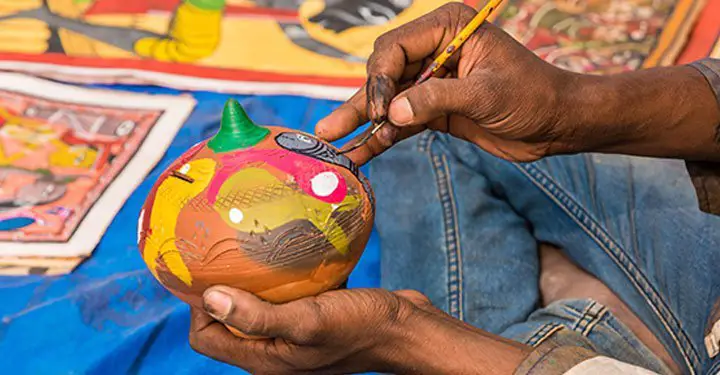 Source: Past Vidya Nesarikar And Siddiqha Naseem @ Parent Circle, "5 easy Indian arts and crafts ideas for kids: Help your little ones proceeds an understanding of our rich culture" (https://www.parentcircle.com/piece of cake-indian-arts-and-crafts-ideas-for-kids/commodity)
Nothing says wholesome and traditional Indian craft than painting an earthen or clay pot nether the cool shade of a big banyan tree during a sweltering hot 24-hour interval. What improve way to get your child interested in art, painting, and crafts than spending a lazy couple of hours on a summer'southward 24-hour interval at abode painting a mud pot.
Yous do not need all that much for this item craft.
Materials
- Clay pot
- Sandpaper
- Pigment, preferably acrylic paint
- A few brushes of different size
Method
The hardest thing about this craft? Figuring out what to paint. Or you lot and your kid could go freestyle and comprehend your inner Jackson Pollock. But here's what y'all need to exercise to get started.
Footstep i: Wash your dirt pot. Go rid of whatever excess dirt or mud that is caked around the edges off with a good rinse.
Step 2: In one case your pot is dry, grab a bit of sandpaper, scrubbing, and scraping till you smoothen the clay. Scrap away hard plenty to remove whatsoever patchy, uneven or rough spots, and to even out bumps.
Pace 3: Your pot is ready and primed. Now all you lot demand is to get started on your painting. Apply acrylic paint to paint some pretty designs on the pot. Feel gratuitous to hit up Pinterest if y'all are looking for inspiration. You tin use thinner, fine bristled brushes to depict on your pot and to cease upwardly with those terminal $.25 of detail.
Display your kid's work on your cabinets, or utilize the pot equally a pencil holder.
Diya Painting
Source: Past The Craftables, "DIY Diwali Diya Decoraction Ideas in 10 Mins!" (https://thecraftables.com/diy-diyas/)
Alternatively, you tin switch out the clay pot, for a Diya. Diwali and festive times call for a mandatory Diya-painting craft session, where your child can apply the aforementioned materials used to paint the pot to paint a colorful, traditional Diya-lamp that y'all can, once more, discover in nigh stores, or order online on Amazon.
Once your child has finished painting and the paint dries up, you lot tin can light a lilliputian candle in in that location or pour some oil, dip, prepare a wick, and low-cal it upward!
two. Paper Plate Rangoli
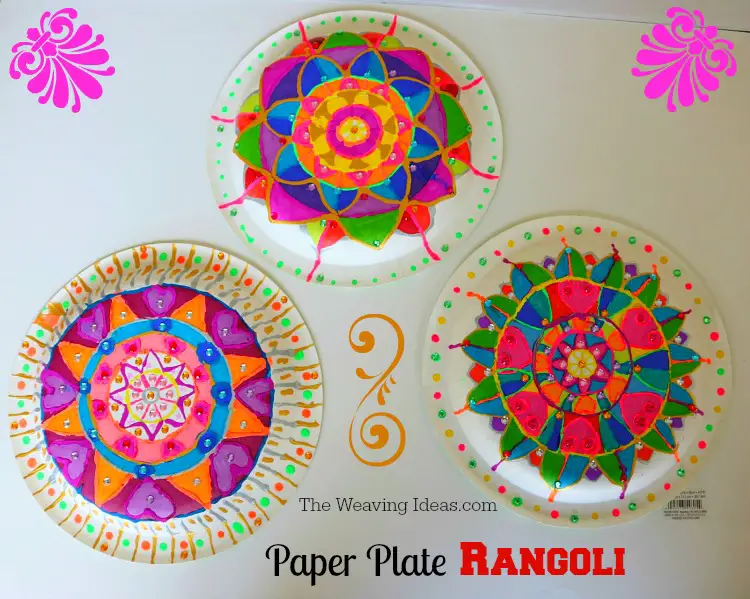 Source: Inspired by Aparna @ Weaving Ideas, "Diwali Arts and crafts: Newspaper Plate Rangoli Thought for Kids" (http://www.theweavingideas.com/2016/10/diwali-craft-paper-plate-rangoli-thought-for-kids/)
Rangoli is such a beautiful Indian tradition. Typically, you employ colored rice flowers and either draw or use patterned sieves to trace cute designs onto a surface, normally the front of your house where everyone can admire it during the festive season. So how do you bring that activity to your kid during craft time?
Rangoli….painted on a paper plate?
Materials
- Newspaper plate, preferably white
- Acrylic paint
- Different-sized brushes
- Pencils to depict your design on the plate or stencils, if you have them.
Method
Step 1: Use a pencil or a stencil to draw a rangoli blueprint onto your plate. If you lot want a unlike colored canvas, and then go ahead and paint your paper plate with a base coat start. Rangoli is pretty colorful on its ain and volition look astonishing even on a banal background to kickoff the colors.
Then if you practice paint the plate, pencil in your design carefully over the paint.
Step two: Now comes the fun part. You accept prepped your plate and have your pattern stenciled out. Go alee and paint swirls of color over them to form a cute rangoli blueprint.
Alternative method
If the pigment isn't your go-to medium, yous can still make rangoli fine art on paper plates. How? You switch out your paints for colored scraps and $.25 of newspaper, of class. Here's how you do information technology.
Materials
- Paper plate
- Four or five colored craft paper
- Pair of scissors
- Arts and crafts glue
- Pencil
Method
Footstep 1: Start by tracing your pattern on the plate with a pencil.
Step 2: Help your child with this step, equally it involves using a pair of scissors: cut out strips and $.25 of colored craft paper, to fit your pattern. Go wild with colour, arts and crafts time is all about color.
Footstep iii: Next, layout the colored paper over the stenciled design and brand sure all the bits go where they need to. Satisfied with the layout and how the colored paper bits look? Hither comes the messy—and fun—role.
Footstep 4: Get-go gluing the bits of paper where they belong.
Tip:
Let the gum to dry. You tin sketch a border for your colored paper and really make your rangoli design stand out.
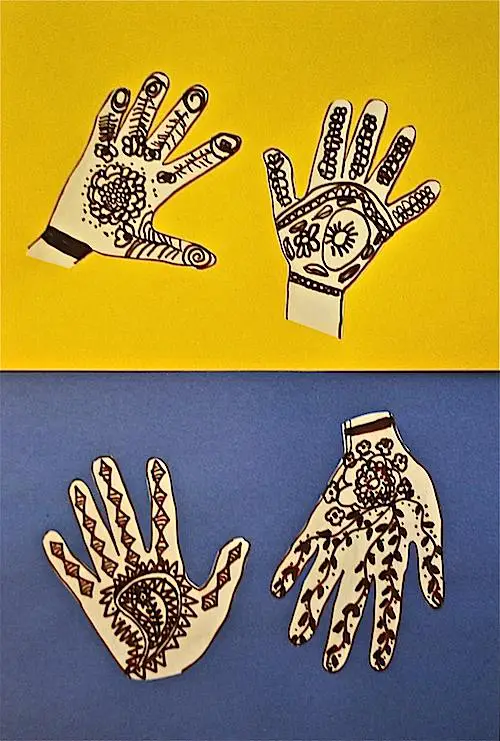
3. Henna or Mehendi Art
 Source: By Becky @ Kid Earth Citizen, "'Henna Easily:' A Simple Craft" (https://kidworldcitizen.org/henna-easily-a-unproblematic-craft/)
What is Henna or Mehendi?
A plant that has been used equally a dye for as long as history tin trace information technology back, henna–or Mehendi (Mehandi or Mehndi) as it is called in Republic of india– brings to yous a smell that is so bawdy, heady and natural , and then reminiscent of the days when the leaves of the henna tree were plucked, washed and and then ground into a paste, right at dwelling house.
Sometimes, y'all'd consume the leaves, although not directly—they are extremely biting. But Mehendi leaves are used equally a central ingredient in many ayurvedic medicines. Mehendi is too used to make a kind of hair pack and so applied to the hair equally a sort of dye, one that stains a bright crimson hue.
But for the purpose of craft time, allow's keep the Mehendi away from our pilus unless yous want to end upwardly a redhead. Here are a couple of craft ideas that involve Mehendi.
Materials
- Pencil
- Newspaper, preferably thick. Consider using chart paper.
- A stick of Mehendi or just a black pen or marker.
Method
Step 1: The first step is to trace your hand onto a newspaper. On a flat workspace, place your left hand—or your non-dominant hand—on the paper and and then lay your palm flat on information technology. Make sure your hands are spread far enough apart. This will help yous get easy access with your pencil.
Step 2: Carefully trace out an outline of your palm, making certain to exist actress careful when you become to the spaces between your fingers where it curves. You can either trace just your palm or trace a certain distance up your arm to get the desired length.
Step 3: Now comes the part where y'all get to describe your Mehendi design on the hand you stenciled.
At that place are ii ways y'all tin can do this.
Method 1
The kickoff would be to pencil your design on the newspaper, and one time you lot're satisfied with how it turned out, ink it with a pen or marker. This item method gives you a lot of room to make mistakes, to change your heed about the design. It gives you even greater room to brand your design colorful: yous can colour in your Mehendi blueprint, or stick to monochrome.
Method 2
This method involves actually using the henna or Mehendi to design your paper hand after you pencil in your design on the paper. Yous can and will find a stick or tube of Mehendi in pretty much whatsoever convenience store across India, or you tin can society information technology off Amazon. Either way, it should not be too difficult to notice if you live in India.
What can be difficult is getting the henna stains off surfaces, cloth, and most often, you tin can await the henna to stain your fingers. So, if you lot are upwardly to get a piddling messy to get the total and authentic experience of Mehendi art and craft, of smelling the fragrance of the Mehendi as you curve over to draw on your hand, so you're in for a treat.
Just make sure to lay plenty of newspapers effectually to control the craft-zone, and also to allow your Mehendi to dry completely when you're done. Using thicker paper will ensure that the Mehendi doesn't soak through.
Bonus Method iii
If you are dauntless enough, you can forgo the paper paw birthday and tattoo pretty designs on your own hands. Adult supervision is definitely advised. Mehendi tattoos are temporary. The lovely tradition of applying Mehendi to a bride's hands goes a long fashion dorsum.
You tin offset with a small-scale design, which you let to dry for a couple of hours and so scrape off with a ruler, or just wash off. Overnight, the Mehendi design will darken into a lush, deep blood-red.
Pinterest has some beautiful designs, patterns, motifs, and stride-past-step instructions for beginners and experts alike to choose from. Mandala or Madhubani Mehendi art is a peachy and unique way to not merely learn how to use Mehendi, but an even greater style to innovate children to a new fine art form.
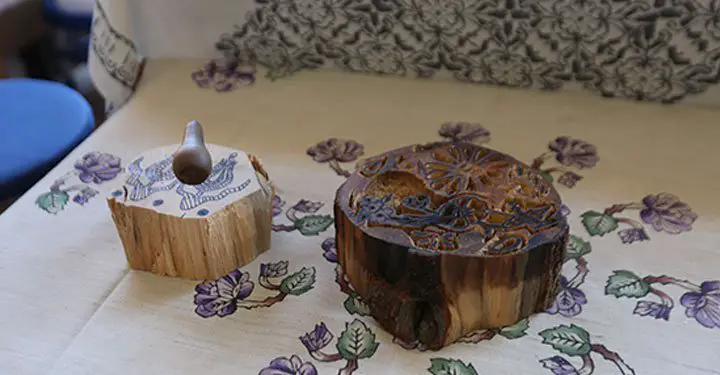
4. Cake Print Craft
 Source: Past Vidya Nesarikar And Siddiqha Naseem @ Parent Circle, "five easy Indian arts and crafts ideas for kids: Help your little ones gain an agreement of our rich culture" (https://www.parentcircle.com/easy-indian-arts-and-crafts-ideas-for-kids/article)
The textile industry in India is exquisite, with its unique prints, patterns, and weaves. Ikkat, Kalamkari, Bandhani, Ajrak. Bagh, Batik, and Patola are just a few in a long listing of prints that India is known for. A bully way to innovate children to the heritage that the material industry of Bharat has in store is block impress crafts.
There is no curt supply of carved wooden or safe blocks and stamps that human activity every bit a stencil to etch a cute pattern onto a canvas, be information technology paper, or material. You can find them at local fairs, craft stores or lodge them online, at a reasonable price. These wooden blocks capture little bits of the traditional prints in their grooves, their carved curves and nooks.
Or, if you lot really want to become creative, read on ahead to find out how to block print…without a block!
I. Block Print Arts and crafts with Fabric
Materials
- The print cake, wooden or prophylactic.
- A small piece of fabric.
- Fabric pigment (alternatively, yous can fifty-fifty utilise a postage stamp pad if you want to mix it up).
- A apartment, broad paintbrush
Method
Step 1: The first step is to decide what colour you want to paint with. Once that'south stock-still, take hold of your paintbrush and apply it to use the paint onto the block. Make sure you cover all parts of the design on the block evenly.
Footstep ii: Layout the piece of textile on a apartment surface.
Step 3: With the design role of the cake facing down, printing the block down on the fabric, applying acceptable and firm force per unit area. Concord for around 5 seconds and carefully pull the cake away and enjoy the lovely print on the fabric.
Two. Block Print Craft on Newspaper
Materials
- Print Block
- Acrylic paint or ink from an inkpad
- A flat, broad castor
- Paper
Method
Pace 1: Using the same method nosotros read well-nigh earlier, use the brush to pigment over the print carving on the block. Yous can paint more than one color on the cake to go a lovely and colorful finish.
Step two: With the design end of the block facing downwardly, once again press the block downwards firmly on the paper. Hold it in place for a few seconds before gently pulling the block stamp away.
III. Bonus Method
I promised a creative way to block print without actually using a cake print or postage and I plan to deliver just that. How? Past using a vegetable instead of a wooden or rubber block!
But what vegetable? How practise y'all get the impress design on the vegetable? Do yous use paint or dye? Here's all you need to know.
Materials
- Vegetable or fruit of pick: potato or zucchini, or apple or pear, if you plan to do some of your own carvings. Alternatively, you tin utilise vegetables similar okra, the leaves of greens similar bok choy, spinach, lettuce, and cauliflowers.
- Paper or Fabric
- Poster or acrylic paint for Paper
- Fabric paint or vegetable dye for fabric
- Chopping board
- Knife
Remember that developed supervision is not-negotiable when using a knife to carve out patterns and designs on the vegetables.
Method
Step ane: Observe an adult to cut, clean, and carve out designs on the vegetable or fruit of choice. Potatoes, pears, apples, and zucchini are super absorptive and will provide a pliable expanse to practice carving. Y'all tin find inspiration on the cyberspace and fifty-fifty a step-by-step- tutorial or two on how to carve designs.
Once your vegetable or fruit carving is consummate, pat it dry.
Step 2: Using the paintbrush, apply the paint, dye or ink depending on whether you use paper or fabric. Alternatively, y'all can cascade a trivial paint onto a newspaper plate or tray and dip the vegetable in information technology. Press the vegetable into an inkpad if using one.
Stride 3: After y'all shake off whatsoever excess paint, with the design facing downwardly, press the veggie onto the newspaper or fabric, belongings it in place firmly earlier removing it to check on the impress.
Tip:
Brand certain you comprehend the surface that y'all lay the cloth or paper on with newspaper, to forbid the pigment, ink or dye from staining it during the printing process.
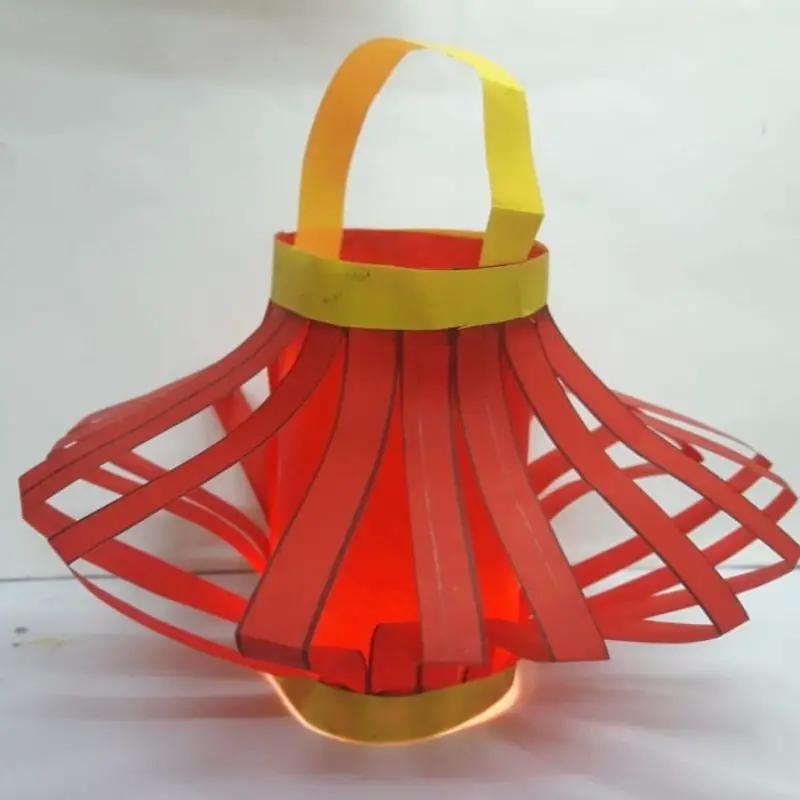
5. Newspaper Lantern Craft
 Source: Inspired by Dr Archana Yeolekar @ School My Kids, "DIY Paper Lantern for Diwali – Easy Décor Ideas for Kids" (https://world wide web.schoolmykids.com/activities/diy-paper-lantern-for-diwali)
Colour and light are prerequisites for whatsoever Indian craft session and a classic and decorative paper lantern is a wonderful craft to learn. No matter where you go in India, you volition notice colorful and attractive paper lanterns hanging off the porch of a house, or in a line, attached to a cord and used as decorations to low-cal up the streets during a festival.
How do you incorporate all that calorie-free, color, fun and make it into a beautiful craft? Newspaper lantern craft session!
Materials
- Colorful sheets of craft newspaper
- Pair of scissors
- Stapler or tape
- Pencil
- Ruler
- Gum
- Decorative trinkets and materials: stickers, ribbons, sequins, souvenir wrap, washi tape, buttons and beads.
Method
Step 1: Choice out the colored arts and crafts newspaper you want to use. Commencement out with A4 size or even just a rectangular canvass of paper.
Stride 2: With the help of an adult, cut out an inch wide strip off the short side of the paper. This volition afterward be used as the handle, so permit's just set it aside for now.
Step iii: Fold the paper in one-half lengthwise and so, using a ruler and a pencil, first marker some other inch wide strip along the length of the paper and draw a line beyond. This line is but a guide, an indicator for when yous start cutting.
Step 4: Starting from the bottom of the paper, cut a straight line upwardly, nearly an inch in width, up the paper, all the way upwards till y'all reach the horizontal line you initially drew. This is the first strip. Keep to cut strips along the length of the paper, till you reach the horizontal finish.
Pace 5: Unfold the paper, and you lot volition notice the several vertical slits that run up and over the middle where you folded the paper in half.
Step six: Now comes the fun office: decorating your lantern! Yous can paint the edges, draw pretty borders, or utilise washi tape to border them. Yous can mucilage sequins, beads and buttons. You tin cut out small flowers and stick them strategically across the trunk. Don't forget to decorate the handle as well.
Just take a brawl decorating your cute lantern.
Step 7: Once you're done decorating, bring the edges of the superlative and bottom of the sheet, and for a tube shape. Make sure y'all overlap the long edges at least half an inch or so.
Step eight: Staple or tape the overlapping ends together securely.
Pace 9: Remember the handle you decorated earlier? Glue the ends on the inside of the lantern's top side.
Allow the gum dry and your beautiful Indian lantern is all washed and prepare for you lot to hang!
Source: https://craftwhack.com/indian-crafts-for-kids/
0 Response to "Indian Crafts for Kids with a Rich Heritage & Culture · Craftwhack"
Post a Comment